Sunday, April 26, 2015

TS files to AE Editing Tips-How to Import TS files to After Effects CS4/CS5/CS6/CC

Hope to edit TS files in After Effects CS4/CS5/CS6/CC? Use the TS to AE Converter, which helps to convert TS file to After Effects for further editing in After Effects CS4/CS5/CS6/CC.

TS file extension stands for Transport Stream. It is a communications protocol for audio, video, and data which is specified in MPEG2 Part 1. TS file’s design goal is to allow multiplexing of digital video and audio and to synchronize the output. File extension TS offers features for error correction for transportation over unreliable media, and is used in broadcast applications such as DVB and ATSC. TS Transport Stream is contrasted with program stream, designed for more reliable media such as DVDs.

If you are using PVR or TV Tuners like Hauppauge WinTV, HD PVR, Humax PVR-9300T, Humax DuoVisio PVR-9200T ,ect record TV episodes, you will get some recorded videos and there are .ts files, .nts, .hmt files. However, only the .ts file include the video and audio stream data. So you will find that you can’t import TS files to After Effects due to the incompatibility of video file formats. The file formats After Effects don’t supports TS format.

To smoothly import and edit MP4 files in After Effects CS4/CS5/CS6/CC, the easy workaround is to convert MP4 to MPEG-2 which is the best codecs with best results when working with Adobe AE. The best tool to help you get it done is Brorsoft Video Converter for Mac.

This converter can be used to convert any TS files to After Effects compatible format (MPEG-2/WMV/MOV) with fast conversion speed and high output quality. After the file conversion, you can edit the video as you like through After Effects. Meanwhile, this video convert tool can create files compatible with various non-linear editing systems like Final Cut Pro, iMovie, and Adobe Premiere Pro, Avid Media Composer, etc. If you are facing problems when editing TS video in After Effects on Windows, please turn to Brorsoft Video Converter. Download the software and this article will guide you through how to rewrap and transcode TS files to MPEG-2 for Adobe After Effects.

(Note: Click here for OS X 10.5)

How to convert TS files to After Effects supported video

1. Import TS files

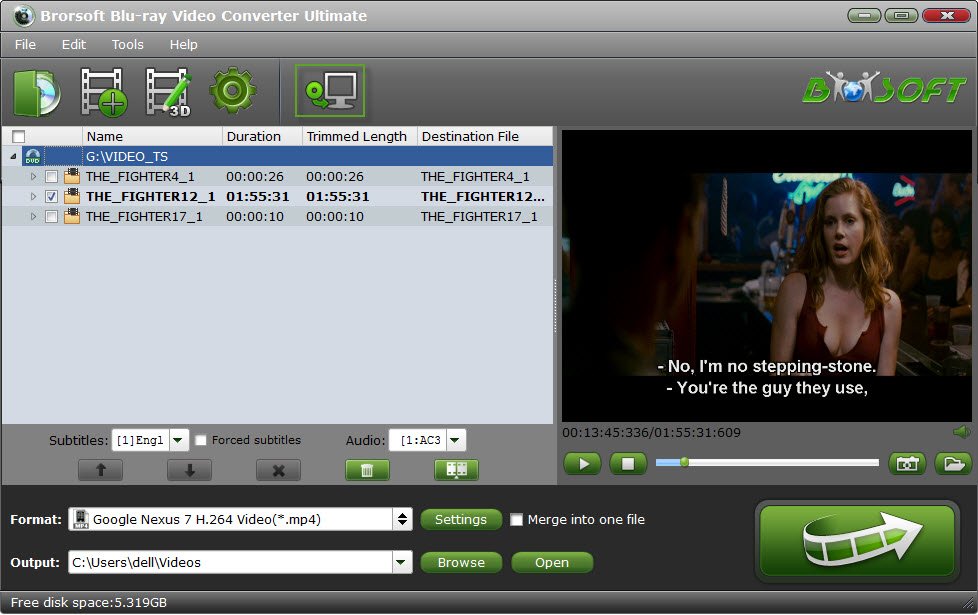
Click File > Add Video/Audio to add the MP4 movies you want to convert for After Effects. Or simply drag your videos to the left item bar for converting. Batch conversion is supported so you can add many files at a time to save the conversion time.


2. Choose After Effects compatible format

Click the format bar to choose output format from the dropdown list. For After Effects editing, Adobe Premiere/Sony Vegas > MPEG-2 (*.mpg) is one of the best compatible video formats for you to choose.


Tip: Click Settings icon you can adjust video codec, bit rate, frame rate, sample rate, and audio channels, etc. To bear least quality loss, you may set A/V parameters according to the source TS file.

3. Start conversion

When all the settings are done, click Convert to start the conversion. Wait for the conversion to be done, you can import the converted video to After Effects for editing without any trouble.

Related Guides:

Edit Nikon D5500/D3300/D5300 in FCP X
How can I get TS files into iMovie 09/10/11
How to Make VOB videos playback on LG TV
How Get iMovie work with Canon G3 X footage
Convert Sony XDCAM to Sony Vegas Pro for editing
Canon XC10 MXF files to Final Cut Pro 7/X workflow
Work With XAVC/XAVC S Footage in DaVinci Resolve 11
Best XDCAM files to Sony Vegas Pro 13/12/11/10 workflow
How to Import MediaPortal TS files into FCP, iMovie and FCE
Migrating Projects from Final Cut Pro to Premiere Pro CC/CS6
Convert MTS/M2TS Video Files to MOV on Mac OS X (Yosemite included)

Wednesday, April 22, 2015

How to Play and Convert MTS/M2TS Video Files to MOV on Mac OS X (Yosemite included)

Back from a trip with a lot of recorded MTS/M2TS video clips and want to share them with your family members and friends, or beautify them on an editing tool that supports MOV format? For convenient playback and editing, you might need to change the video format from MTS/M2TS to MOV on Mac(Yosemite, Mavericks included). And this is a specific tutorial, aiming at helping you convert MTS or M2TS files to MOV files on Mac.

Source From: Converting MTS/M2TS to MOV with zero quality loss

AVCHD (Advanced Video Coding High Definition) is a format for the recording and playback of high definition (HD) video. It is with .mts extension which is a high-definition MPEG, AVC, H.264 transport stream video file format. AVCHD MTS files are used primarily with Sony hardware. Some camcorder models from Canon also use MTS files. These files are also present on Blu-ray disc compilations, therefore they are capable of storing quite a large amount of information and data tracks.

Do you want to enjoy MTS with QuickTime Player, edit MTS in Final Cut Pro or iMovie? Here we will teach you how to convert AVCHD MTS/M2TS video to Mac OS X playable video format MOV, and play AVCHD on Mac OS X, including the latest Mac OS X 10.10 Yosemite.

First and for the most, you need download and install the professional app-Brorsoft MTS/M2TS Converter for Mac. Depite of its nice feature for converting MTS/M2TS to MOV, it offers you some editing features as well. You can either merge video clips into a large file or trim a file into segments. What's more. you can also change the video effect.

Download the software and learn how to convert MTS to MOV on Mac OS X in detail.

Download MTS Converter for Mac:

(Note: Click here for OS X 10.5.8)

Step 1. Add MTS footage

Once you run the MTS to MOV Converter Mac, click "Add Video" button to load your source MTS files. When MTS files are loaded, you can view the videos from the Preview window. By checking the "Merge into one file" box, you can merge MTS clips into one file.


Step 2. Select "MOV" from the output format list

Setting an output format has never been easier. Just choose MOV - QuickTime (*.mov) as the output format in the format tray. To adjust the video settings, click the "Settings" button that appears when you mouse over the format icon. Video resolution, bit rate and frame rate are included there.


Step 3. Start the MTS/M2TS to MOV Mac conversion

Click the "Convert" button to get the conversion done in a few minutes. You see, just 3 simple steps and you can convert camcorder MTS/M2TS files to MOV on Mac. If you are busy, you can set "When all jobs finished" to "Shut down my computer" in the Preferences dialog of this Video Converter for Mac.

More Topics:

Convert DVD to Samsung Gear VR friendly format
MTS footage won’t work in DaVinci Resolve(Lite)
Edit TS with iMovie 11/10/09 in AIC MOV format
Convert MTS/M2TS to iPhone 5 MP4 video on Mac OS X
How to Get Final Cut Pro Working With Individual .mts/.m2ts
Can DaVinci Resolve handle the 4K XAVC/XAVC S playback
Migrating Projects from Final Cut Pro to Premiere Pro CC/CS6
Make Sony HDR-PJ810 AVCHD editable in Adobe Premiere CC
How to rip Blu-ray and DVD movies to Nokia N1 Tablet in clicks
How to Edit AVCHD (.mts/.m2ts) footage in Adobe Premiere Pro

Sunday, April 19, 2015

Useful tip on how to burn Blu-ray with Windows Media Player 12

Any questions about how to Burn Blu-ray with Windows Media Player 11,12?

"As for the Windows Media Player 12, the program is useless anyway, does not play simple single mpeg video files, let alone Blu-ray discs. The WMP 12 stops responding and freezes forcing you to close the wmp program. I am looking for an effective way to play Blu-ray movies in Windows Media Player. Thank you for any tip!"

The software technology for playing these disks isn't free — just for the right to use the patented technology needed to play DVDs. So what is a movie-loving Windows Media Player 12 user to do? There are basically two options: getting an alternative player to afford Blu-ray discs or finding third party software that can play disks. Let's go over both possibilities.

Source From: Copy Blu-ray movies to Windows Media Player 12 for playing

Option A: Install A Different Media Player

VLC can be considered as a powerful media player to afford DVDs and BDs. However, it could only recognize unencrypted Blu-Ray disk. In a word, the option is fantastic for DVDs, but somewhat lacking for Blu-Ray. Thus, you may need something commercial for the job for playing Blu-ray movies in Windows Media Player 12.

Option B: Get an ideal third party program

Since Windows Media Player can not afford Blu-ray disc directly, then the easiest solution to watch Blu-ray movies on Windows Media Player is to rip Blu-ray disc content into Windows Media Player supported formats like WMV, MP4 .etc. Under this circumstance, a powerful Blu-ray tool-Brorsoft Blu-ray Ripper is highly recommended to deal with DVD/BDs to common video formats for playing on Windows Media Player 12. Download the software on your computer and follow the guide below to start conversion.

How to Rip Blu-rays to WMV for Windows Media Player 12

Step One: Insert your Blu-ray into driver, and add your Blu-ray disc via "Load" button to the app. This program also supports DVD discs and DVD/BD folder.


Step Two: From the Format menu, select Windows Media Player friendly format as your output video format. There, you can take WMV as your output video format.


Tip: If you are still not satisfied with the defaulted profile settings, you can click "Settings" to change the video encoder, resolution, frame rate, etc. as you wish.

Step Three: Tap the convert button and start Blu-ray to Windows Media Player conversion.

When the conversion completes, you will be able to get the result video via "Open" button. After that, you can stream or transfer the converted Blu-ray videos to WMP 12 for smooth playback at ease without any problem.

Related Guides:
How can I get TS files into iMovie 09/10/11
Tricks for Editing Nikon 1 J5 4K video in iMovie
How to Enable Gear VR to Play 3D Blu-ray movies
What if Windows Media Player won't play AVI files
How to Play H.265 Videos in Windows Media Player
How to Get Windows Media Player to Play TiVo files
How to Solve Windows Media Player Won't Play VOB files
Convert and Import Sony FDR-X1000V footage to FCP/iMovie/FCE
Edit Sony HDR-PJ810 AVCHD recordings in Premiere Pro CC/CS6/CS5

Tuesday, April 14, 2015

YouTube H.265 Support: Transfer H.265 videos into YouTube

If you want to upload H.265 files to YouTube for sharing, the simple workflow is to convert H.265 to YouTube friendly format. Read on.

HEVC/H.265 is the successor codec to AVC/H.264, and it’s designed to deliver two key benefits: equivalent quality to H.264 at approximately 50 percent the data rate, and 4K and ultimately 8K video. Unlike H.264, there is no widely available free player for HEVC, let alone uploading H.265 files to YouTube or other websites. This article will discuss how to add H.265 video files to YouTube for sharing.

Some Digital Company like Samsung and Panasonic has already size the new 4K market by releasing new 4K camera which can shoot under H.265/HEVC. After recording, the users have demands to upload to YouTube, Vimeo or Facebook. However, YouTube can not support H.265 codec currently. Therefore, you'd better find a powerful tool to encode H.265 codec into YouTube friendly codec first.

What I used is just a professional H.265 Converter-Brorsoft Video Converter Ultimate. With it, you can effortlessly convert H.265 to H.264 for uploading to YouTube. Besides H.265 video files, it also can deal with other video formats including MTS, MXF, MOV, MKV, XAVC .etc. Just get the program and follow the step-by-step guide on how to convert H.265 to YouTube in a few clicks!

How to Upload H.265 videos to YouTube

One: Click the "Add" button to import your videos. You can view the H.265 raw video directly in the preview window.

laod-blu-ray-dvd-videos

Two: Go to Format bar to select an output format. To share your H.265 videos on YouTube, .mov, .mpeg4, .avi from Common Video are all the proper formats.


Tip: If you want to do some personal adjust on your raw videos, just go to the "Settings" UI to adjust Bit rate , Frame rate or Audio Channels. You can see the whole output file size on the bottom of this button.

Three:Tap the "Convert" button on the main interface and we can easily get the output videos. After the conversion, you can click the "Open" panel to check your converted files.

Guide on Uploading video files to YouTube:

1. Sign into YouTube.
2. Click the Upload link at the top of the page.
3. Select the video you'd like to upload from your computer. (Enter as much information about your video as possible, including Title, Description, Tags, and Category.)

Read More:
H.265 Video Tips:

Convert DVD to H.265
Rip Blu-ray to H.265
Encode videos to H.265 MP4
Backup Blu-ray to H.265 Windows 10
Blu-ray to Samsung TV h.265 codec file
BD/DVD to H.265 with Handbrake
Blu-ray to MKV with H.265/H.264 Codec
Encode Blu-ray to H.265/h.264 MP4
Best H.265 Encoder for Windows
H.265 Hardware Software Boxes Console Support

Thursday, April 9, 2015

Let's Convert/Transcode AVCHD .MTS/M2TS to MP4 on Windows and Mac

This article mainly focuses on how to convert MTS/M2TS footage files to MP4 for playing AVCHD .MTS/M2TS files more widely.

You may have accumulated many MTS, M2TS files, I think they are produced by canon or Panasonic high-end camcorders. MTS/M2TS format is great to record high-definition videos, but it is not easy to use. For example, they are not supported by many websites and tablet, smartphone. we can't play MTS/M2TS video on tablets or cellphones directly. You may have the need to convert MTS/M2TS to MP4 format for use, here Brorsoft MTS/M2TS Converter for Mac will help you out.

This is a professional MTS converter for Sony, Canon, JVC and Panasonic AVCHD camcorder/camera owners. It enables you to convert recorded AVCHD .mts/m2ts videos to MP4, AVI, WMV, MOV, FLV, MKV, etc various video formats for using in portable devices like iPad, Apple TV, Galaxy Tab, VLC, iTunes, etc. What’s more, you can get many optimal presets for video editing software (e.g. Apple Intermediate Code for iMovie, Apple ProRes for Final Cut Pro, DNxHD for Avid Media Composer, etc). There’s also Windows MTS/M2TS Converter available.

How to transcode AVCHD (*.mts/*.m2ts) to MP4 with the best quality

Step 1. Transfer the videos files (MTS/M2TS) shot with your HD camcorder to your computer.

Step 2. Run the MTS to MP4 Converter Mac. Click "Add video" or "Add from folder" button to load MTS recording to the program, or also support to drag and drop AVCHD mts/m2ts files to the program.


Step 3. Set output video file format as MP4. H.264/AVC and MPEG-4 encoded MP4 formats are available. For some common protable devices, special output formats are listed for you, such as Android, iPad, iPhone, HTC and so on. If you like, you can click the "Settings" to set parameters for your devices.


Step 4. Click "Convert" button to start AVCHD MTS to MP4 video conversion. After conversion, you can click "Open" to quick locate converted videos. What’s left is to play and enjoy your video.

More features of the AVCHD MTS converter:

1. Find "Edit" icon and then click it, you will find video editor. There you can Trim, Crop, Add watermark and Effect. Above all, Subtitle can be added here. If you don’t want to do some change, just skip the step.


2. Click Settings, you can adjust codec, bit rate, frame rate, sample rate and audio channel in the interface according to your needs and optimize the output file quality.

More Topics:

How to Convert MTS to MP4?
Transcode GoPro 4K files to edit in After Effects
How to Get iMovie work with Sony SR10 MTS files
Importing AVCHD 1080/50p MTS to Pinnacle Studio
How to Convert 4K MP4/MOV/MXF to FCP for editing
Convert Sony HDR-MV1 MP4 to ProRes for FCP editing
Convert MTS/M2TS to iPhone 5 MP4 video on Mac OS X
Sony Handycam MTS files to Pinnacle Studio best workflow
Import 720p/1080i/1080p AVCHD to Avid Media Composer
Tricks for Editing AVCHD MTS/M2TS files in Pinnacle Studio
Convert MTS/M2TS/XviD/MOD/TOD/TiVo to MP4- Sync videos

Monday, April 6, 2015

Sony A77 ii to FCP-Make Sony Alpha a77 MkII 1080p@60fps clips in FCP X without rendering time

From this article you will know the way to import Sony A77 II recorded AVCHD MTS files to FCP X, and edit with FCP X native supported Apple ProRes 422/4444 codec, you won’t have any Sony Alpha 77 Mark II to FCP X importing and editing problems.

The Sony Alpha a77 MkII is an extraordinary high spec enthusiast / semi-pro digital SLR camera that has a hugely detailed 24.3 megapixel Exmor® CMOS sensor. Designed to ensure you never miss the moment in also has 12fps continuous shooting for amazing action sequences, and 79 AF points for a very sophisticated and accurate focus. The BIONZ X image processor makes sure even with all this information the camera never gets flustered.

Video Format AVCHD / MP4 (MPEG-4 AVC (H.264))

Video Mode AVCHD: PS - 1920 x 1080/60p@28Mbps FX - 1920 x 1080/60i@24Mbps FH - 1920 x 1080/60i@17Mbps FX - 1920 x 1080/24p@24Mbps FH - 1920 x 1080/24p@17Mbps MP4: HD - 1440 x 1080/ 30p@12Mbps VGA - 640 x 480/30p@3Mbps

Q:Sony Alpha a77 MkII and FCP 7 Workflow

"Has anyone worked with media from the Sony A77 MkII camera. Looking for some tips regarding post workflow and getting the media into FCP 7.

I have 1080P AVCHD of the footage which doesn't always get along with fcp.Any and all advice is welcome and appreciated."

Best Answer Here:

Here I suggest you to use Brorsoft MTS Converter for Mac to convert 1080p AVCHD to ProRes at 29.97/30fps( For clips converted from 60FPS to 30FPS, 200% rate change will get it back to original speed ). The tool has five types of Prorews codecs for choosing.


It is perfect in transcoding 1080p/1080i AVCHD to ProRes 422 to edit in FCP, including FCP 6/7 and FCP X. In addtion, it is developed with some easy and useful editing functions, such as deinterlacing 1080i files, joining imported clips together for easy ingesting, trimming section of your file, adding text/image/video watermark to your original files, replacing audio tracks, etc. With it, you can effortlessly get 1080p AVCHD files converted to ProRes codec and transfer your Sony Alpha 77 A77 Mark II HD recordings to FCP.

Guide on ingesting Sony A77 ii AVCHD footages to Final Cut Pro X, FCP 7

Step 1. Run the MTS Converter and click the “Add File” button to load AVCHD 1080 60p/50p videos from Sony A77 II camera.


Step 2: Click on the Format box and select the FCP friendly format in dropdown-list. You are advised to choose “Apple ProRes 422 (*.mov)”or “Apple ProRes 422 HQ (*.mov)” format. Due to the difference in the compresstion standard of AVCHD and ProRes 422, the converted files are significantly larger than the original ones. If you prefer smaller file size, please choose “Apple ProRes 422 (LT) (*.mov)” instead. The “Apple ProRes 422 (Proxy) (*.mov)” format offers file size at SD levels and is recommended for 480i/p and 576i/p shootings.

Step 3: Adjust audio and video parameters in Profile Settings. You can change the default codec, bit rate, frame rate, sample rate and audio channel according to your needs and optimize the output file quality.
Tip:Set video size as 1920*1080, video frame rate as 30fps. If the clips are recorded as 50p(PAL), then 25 frame rate is the best choice for you.

Step 4: Click the arrow button on the main interface to start converting 60p AVCHD to ProRes for editing in FCP X.

After converting and merging the MTS files, just directly drag adb drop the output files to Final Cut Pro X without rendering time.

More Topics:

How to play 1080p MKV movies on Samsung TV
How to Get iMovie work with Sony SR10 MTS files
Best software to convert AVCHD MTS/M2TS to MP4
Can Adobe Premiere Pro import AVCHD 1080 60p files?
Convert Sony A77 AVCHD 1080p MTS/M2TS to Adobe
Importing .mts AVCHD files from Sony Alpha DSLR(SLT)
Transcoding Canon Vixia MTS video to Adobe After Effects
Import 720p/1080i/1080p AVCHD to Avid Media Composer
Edit Sony HDR-AS200V 4K XAVC-S/H.264 MP4 to Vegas Pro
Import & Edit Sony NEX-5N/NEX-7/A57/A65/A77 1080 50p/60p
Import Sony FDR-AX1 4K/60p XAVC S files to Premiere Pro CC/CS