Monday, November 30, 2015

WebM to ProRes - Import WebM to Final Cut Pro X or FCP 6/7 best workflow

Summary: The easy workaround to get Final Cut Pro X/7 work with WebM files is to convert WebM to Apple ProRes codec, which ensures the best results when using in FCP X/7.


Final Cut Pro is a wonderful tool to help you turn your home videos into professional eye-catching movies. And it normally can recognize a few file formats like DV, HDV, QuickTime, Motion JPEG. The point here, sometimes you will find it a painful experience to import WebM files into Final Cut Pro X/7/6 for further editing, and you may have encountered problems quotes as below:

“How can I bring WebM to Final Cut Pro on Mac for editing? I can't seem to get WebM files open in QuickTime or FCP. T Main thing is getting them to open in FCP as I need to edit them ASAP. Is there a good solution?”

Actually, the WebM file structure is based on the Matroska container, which is not supported by Apple's Final Cut natively. To get WebM files and Final Cut Pro to work beautifully, the easy workaround is to transcode WebM to Apple ProRes, which ensures maximum editing quality and efficiency when working with Final Cut Pro. With some help from Brorsoft Video Converter for Mac, it can be done effortlessly.

With this professional WebM file converter, you can easily transcode WebM files to ProRes 422, ProRes 422 HQ or 4444 for using in Final Cut Pro X/7/6. Besides, the Mac video converter can convert HD, Full HD and even 4K videos from cameras/camcorders (like JVC, Panasonic, Sony Cannon, BlackMagic, GoPro, etc) for editing in Final Cut Pro, Final Cut Express, iMovie, Avid Media Composer, Adobe Premiere Pro and more NLEs. Don’t hesitate to download and install the program now.

Guide: Convert and Import WebM to Final Cut Pro

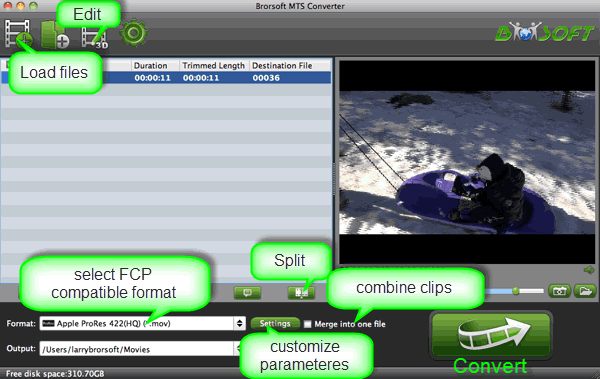
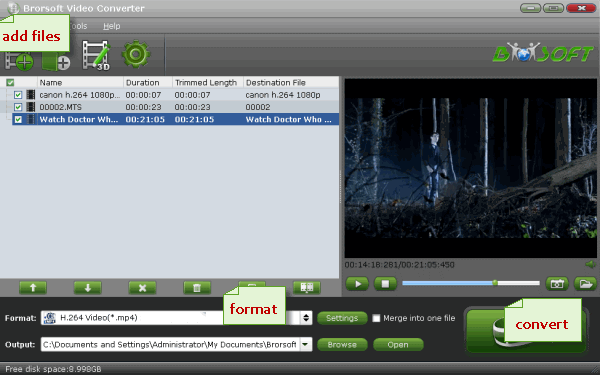
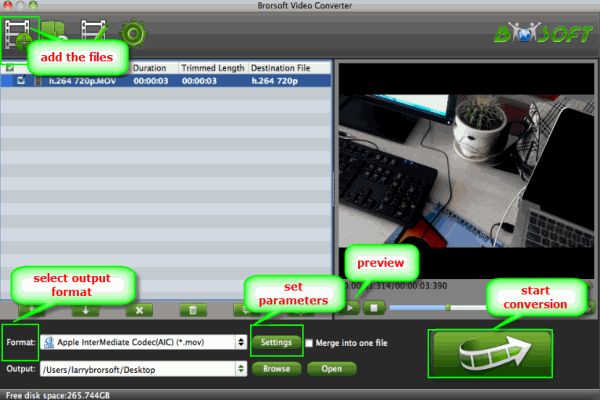
1. Launch the WebM to ProRes Converter program; click "Add" button from main menu to browse your computer hard drive and select the WebM files you want to convert. Or you can easily drag-and-drop files into this application for converting.


Tip: You can check the "Merge into one" box to merge several webm video files together for easier editing.

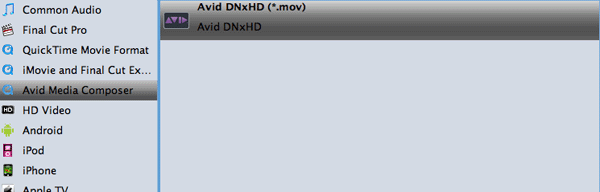
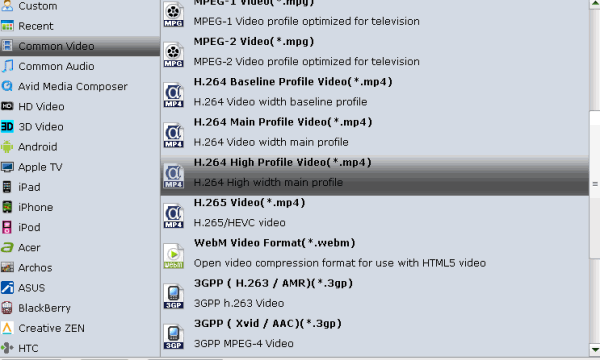
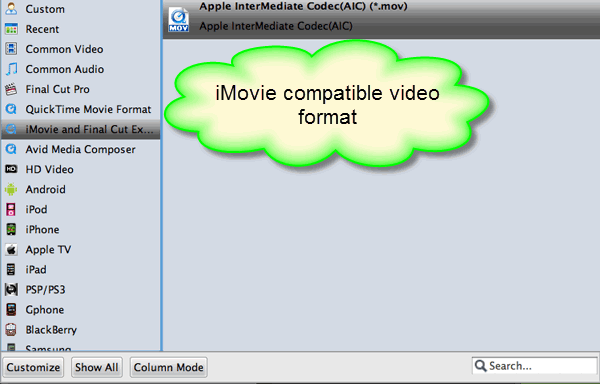
2. Click the format bar, and move mouse cursor to "Final Cut Pro > Apple ProRes 422 (*.mov)", an preferred editing format for FCP.


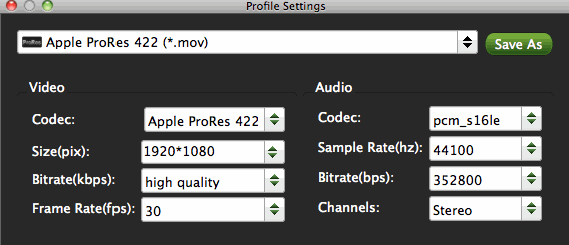
Tip: In case the default settings do not fit your requirement, you can click "Settings" button and enter "Profile Settings" panel to adjust video size, bit rate, frame rate, sample rate and audio channels.


3. Click Convert button to start converting WebM to ProRes for Final Cut Pro on Mac OS X. After the converison, you can click "Open" to find the .MOV videos which can be directly imported to Final Cut Pro X or FCP 7/6. Just enjoy your movie editing.

See also:
Convert VOB to MP4
Convert AVI to QuickTime
Convert MP4 to Premiere
Ripping DVD ISO movies for uploading to Dropbox
Convert WebM video files to MP4 in Windows/Mac
Read and Get the 2015 Top 5 Free DVD Rippers Reviews
How to Convert WebM to MP4, MOV, AVI, FLV, MPEG
How to Convert and Import WebM files to iMovie on Mac
Transcode MTS to MOV on Mac El Capitan no quality loss
Rip DVDs to 3D (SBS 3D) movies on Mac OS X (El Capitan Included)

Tuesday, November 24, 2015

Canon XA35 and Avid MC Issues-Convert/Edit XA35 AVCHD to Avid Media Composer

Got Problems importing Canon XA35 AVCHD footage into Avid Media Composer for further editing? Look no further, follow the easy workaround to achieve your goal smoothly.

The compact all-in-one XA35 camcorder boasts a wide dynamic range and an HD / SD-SDI terminal – making it ideal for professional mobile news gathering and for journalists who need to capture content discreetly, especially in challenging high contrast lighting conditions.

Sensor resolution: 2.91 megapixel sensor

Video format: AVCHD, MPEG‑4

Storage media:SD Card

Brand: Canon

HD format: 1080p

Connectivity: Wireless, HDMI, Composite, HD‑SDI

As a Mac and Avid Media Composer user, I like to edit 1080p AVCHD video with Avid MC. Although We understand that Avid MC can import AVCHD – but apparently not all flavors work well. It is not easy to import Canon XA35 to Avid Media Composer for editing on Mac , and Canon XA35 AVCHD is hard to be perfectly recognized by some other video editing software like FCP, FCE, iMovie.


So we need to use a 3rd party convert to convert the Canon XA35.mts files into .mov with a DNxHD wrapper for Avid MC. Brorsoft Mac Canon AVCHD to Mac Converter is the one I choose. Fast convert AVCHD .mts from Canon XA35 to DNxHD .mov files, which will fast import into Media Composer. As for video quality, at least I cannot distinguish any loss by naked eyes. And this top AVCHD to Avid MC Converter for Mac can also help you convert AVCHD recordings to AIC, MPEG-2, MOV(AVC) for iMovie, FCE, FCP, Adobe Premiere, etc.

Transcoding Canon XA35 MTS recordings to Avid Media Composer

Step 1: Install and Launch the Mac MTS Converter and load your .mts/.m2ts files to it.


Step 2: Click on the Format box and select a proper format in dropdown-list.

For Avid Media Composer, you can choose Avid Studio> Avid DNxHD(*.mov);


Step 3: Click "Settings" button if you’d like to customize advanced audio and video parameters like Video Codec, aspect ratio, bit rate, frame rate, Audio codec, sample rate, audio channels.

Step 4: Click the Convert button on the main interface to start the Canon XA35 to Avid Media Composer conversion. Once the process is at 100%, then the converted video is ready for importing and editing on Mac OS X.

Additional features with the best AVCHD MTS Converter:

1. Joining files: Tick the box "Merge into one" on the main interface.
2. Preview: Double click on the file and you can get a preview on the converter.
3. Crop: Edit --> Crop and you can get the imported videos cropped as you want.
4. Auto shutdown: Click Option and tick the box “Shut down the computer after conversion” before conversion starts.

See also:

Convert MTS to Andorid
Convert 3D AVCHD MTS
Trancode MTS for Premiere
Convert and Play MKV on DVD Player
Transcode MTS/M2TS to Pinnacle Studio
Convert and Import Webm to FCP for Editing
Import and Edit MTS files in Premiere Pro CC
Convert Divx Xvid AVI to Sony Movie Studio
Convert MKV, AVI, VOB, MPG, FLV to iTunes 11
Converting H.264 to MPEG-2 for Adobe Premiere Pro
Transcoding Canon XA35 MTS recordings to FCP 6/7/X
Import Panasonic HVX200 MTS to FCP 6/7/X on El Capitan
Transcoding Canon XA35/XA30 MTS recordings to Adobe Premiere Pro

Wednesday, November 18, 2015

New Fire TV MKV Playback Tips-Stream MKV to Fire TV 2 for Watching MKV on Fire TV 2015

How to prepare your MKV videos for playback on Fire TV 2? Luckily, there's a workaround that can make your movies playable on the new Fire TV, read on ! 

The new Fire TV supports Ultra HD (UHD) video content, and I had no problems viewing Alpha House on Amazon Instant Video and Daredevil on Netflix in 4K. Both services depend on a fast network connection to display 4K content, so don't count on a consistent UHD stream if your network is slower than either service recommends, and get ready for occasional compression artifacts with network hiccups. That said, both shows came through fast and crisp on the new Fire TV connected to our FiOS test network. 

As we know, Amazon Fire TV 2 video formats are limited to H.263, H.264, MPEG4-SP, VC1, so you could not transfer MKV to Amazon Fire TV for playback directly. 


Since MKV is not a format supported by Amazon Fire TV 2, in order to watch MKV movies on Amazon New Fire TV, you need to convert MKV to Fire TV formats (H.263, H.264, MPEG4-SP, VC1). Here BrorsoftVideo Converter is recommended to make MKV playable on Amazon Fire TV 2015. 

It allows you to convert MKV files to Amazon Fire TV 2 compatible MP4 at fast speed with the best quality. Besides, it can also convert MKV to any video or audio format like .avi, .wmv, .mov, .flv, .mpg, etc as you want. This MKV converter supports batch conversion, so you can convert multiple files at a time, which will save you a lot of time. To create personalized MKV files, you can also adjust the visual effects, add unique watermarks and more. All these will be done by the built-in video editor. If you are looking for ways to convert MKV for Amazon Fire TV 2 on Mac, BrorsoftVideo Converter for Mac is highly recommended. 

Download MKV to Amazon Fire TV Converter: 

  (Note: Click here for OS X 10.5) 

How to convert MKV for playing on Amazon Fire TV 2 

1. Load MKV files to the converter 

Launch the MKV converter for Amazon Fire TV 2 and click Add to import the MKV movies you need to convert. Or directly drag videos to the left item bar to load them. Batch conversion is supported so you can add multiple files for converting at a time. 


2. Choose Amazon Fire TV 2 compatible format 

To view MKV on Amazon Fire TV, next you need to choose an output video format. You can click Format > Common Video and set output video format as mp4 for playing on Amazon Fire TV 2015. 


3. Touch up MKV files as you like(optional) 

Click Edit button to open the powerful video editor. It allows you to crop the video frame, split the video into small segments, change visual effects, add subtitles/watermarks and more. 


4. Start to convert MKV to Amazon Fire TV 

When all settings are done, what you need to do now is to click the Convert button on the right bottom of the main window to start encoding MKV to Amazon Fire TV. When then conversion completes, you will be able to transfer all the converted MKV files to Amazon New Fire TV with ease. Enjoy. 

Related Guides: 
Import MKV to Avid 
Convert MKV to Vegas 
Convert MKV to ProRes 
Movie Maker Open MKV 
VLC MKV Playback Solution 
How to Backup Disney DVDs on Mac OS X 
Tutorial: Convert 4K files for AirPlay to Apple TV 4 
Convert and Import VOB to Frie TV 2 ( 2015 Vesion ) 
How do I stream DVDs to the New Fire TV through Plex? 
How to Convert MKV/AVI/VOB to M3U8 for iPad/iPhone

Thursday, November 12, 2015

Work and Edit Sony A7R II 4k xavc-s footage in Premiere Elements 10/11/12/13

The following paragraphs show us how to edit 4K XAVC-S footage from Sony A7R II with Premiere Elements without bogging down your computer. The process is surprisingly easy and can be done with the help of Brorsoft Video Converter for Mac. 

Sony has announced the a7R II, a 42.4MP mirrorless camera with an image stabilized full-frame BSI CMOS sensor. Unlike its predecessor, the camera includes on-sensor phase detection elements for faster autofocus, which continues to work with other brands' lenses. 

The camera can capture 4K (UHD) video at 30p/25p or 24p in the XAVC S 4K format. The 4K video can be taken either from the full sensor width or from a Super 35 crop. Even this smaller crop over-samples by around 1.4x. 

If you have some XAVC-S videos from Sony A7R Mark ii , you may want to edit the 4k files in Adobe Premiere Element. Although the latest Premiere Elements added many new features, it still can't support 4k xavc-s. You will encounter incompatibility issues when import 4k xavc-s to Premiere Elements. 


After multiple testing, the only possible way we figured out is to convert XAVC-S to Premiere Elements edit-friendly format before editing the files. For those who don't wanna spend time and effort to find a proper video converter that works for you, just download and use Brorsoft Video Converter for Mac, which is able to resolve your trouble effortlessly. This video app can help you change Sony A7R Mark ii 4K XAVC S into a different format (e.g. .mov, .wmv, .mpg) with least quality loss. You should then be able to import the new file into Premiere Elements with smooth editing without any trouble. If you are Windows users, please get the Video Converter.

 (Note: Click here for OS X 10.5)  

How to rewrap and transcode Sony A7R II 4K video for Adobe Premiere Elements 

1. Load XAVC-S Files to the Program 

Run the 4K Video file converter and you can import Sony A7R II 4K XAVC-S clips to the program through "Add Video" button or just drag and drop the files to the program. If you like, check the "Merge into one" box to join XAVC S clips together. 


2. Choose Output Format 

This video converter offers optimized format preset for Adobe Premiere. Just click "Format" menu firstly and then follow "Adobe Premiere/Sony Vegas" to set MPG, MOV or WMV format. 


Tips: You can click "settings" button in the main interface to customize the output video's parameters, such as resolution, frame rate, etc. 

3. Start Sony A7R II XAVC-S to Premiere Elements Conversion 

Click the big "Convert" button at the bottom right corner, this Mac video converter will start to convert XAVC-S to MPEG-2/MOV for Adobe Premiere Elements 10/11/12/13. 

Once the conversion done, you can click "Open" button to get the output files effortlessly. Now you have got it right, just to import and edit Sony A7R II XAVC-S files with Adobe Premiere Elements at ease. 

Read More: 

4K workflow with Premiere 
4K workflow with Avid MC 
4K workflow with Sony Vegas 
4K Workflow with After Effects 
4K Workflow with EDIUS 
4K Downscaling to 1080p 
Load Sony A7R II 4K XAVC S to FCP (El Capitan) 
Sony A77 II Workflow within Final Cut Pro X/7/6 
Import Sony A77 Mark II avchd files to Davinci Resolve

Monday, November 2, 2015

Bandicam to iMovie Converter - Convert AVI, WMV files from Bandicam to iMovie AIC MOV

Want to nicely import AVI files from Bandicam to iMovie for editing smoothly ? You can convert the recorded video file while keeping the original video quality after reading this article.

The recorded videos came from Bandicam usually goes to AVI or WMV. Those formats are compatible with most devices. But since those formats are both “Container” formats, the codec in this “Container” may disorder in it. If you are puzzled by the problem that you can't import Bandicam AVI files to iMovie directly, here recommend you the best Bandicam files to iMovie converter to solve the issue.


Brorsoft Video Converter for Mac is one of the best Mac Bandicam video converter tool for you. By running it, there’s no need to set the codec yourself: the program has optimized presets for iMovie. Besides Bandicam AVI, you can convert any video file like WMV, FLV, VOB, MPG, MKV to iMovie compatible format without loosing quality.

Now please follow the guidance below to download Bandicam AVI to iMovie converter to convert AVI/WMV to iMovie so as to import Bandicam video files into iMovie successfully.

Convert and Import Bandicam video clips to iMovie on Mac

Step 1. Install and launch Bandicam video converter on your Mac, and then import .avi or .wmv files to the converter.


Step 2. Click on "Format", and select output format from the drop-down list. Follow and select iMovie/FCE > Apple InterMediate Codec(AIC) (*.mov) as the output format.


Tip: Click "Settings" button if you'd like to customize advanced audio and video parameters like Video Codec, aspect ratio, bit rate, frame rate, Audio codec, sample rate, audio channels.

Step 3. Finally, hit convert button to start transcoding Bandicam video to Apple InterMediate Codec .mov for iMovie.

After the conversion, you can find the converted file by clicking the open button. Then Bandicam videos will be available in your iMovie.

More Guides:

Convert MKV
Convert AVI
Convert VOB
Convert MP4
Convert MPG
Transcode MXF
Convert AVCHD
Importing Bandicam video to Final Cut Pro
Ideal MXF Converter for Mac OS X macOS Sierra
Import Canon XF305 MXF files to Adobe Premiere Elements
Fix Corrupt MXF files Effectively under Mac OS X (macOS Sierra)
Convert AVCHD (MTS/M2TS) to SBS 3D MP4 Video for Gear VR