Wednesday, April 27, 2016

How to Play Tivo Recordings on Windows Media Player on Windows 10 ?

In this page, we will talk about some tips and tricks to get Tivo recordings to Windows Media Player with smooth playback. Just read on, so that you can play Tivo videos in Windows Media Player with ease.

TiVo, the professional digital video recorder, provides us with marvelous videos, TV shows, and movies. Many people choose to record their loved television programs from Tivo Roamio DVR and watch them later on their computer.But the default media player on Window, including the newest Windows 10, is Windows Media Player, which can’t read TiVo recordings directly. So how to play TiVo recordings on Windows Media Player on Windows 10?

Since WMP can work H.264 MP4, WMV videos well, one possible solution is to convert Tivo Shows to H.264 MP4/WMV video for playback with Windows Media Player easily.

One of the best Tivo converter from the market so far is Brorsoft Video Converter, which supports Tivo encoding, decoding and has added the overall playback support to Tivo. Overall, this program is a completely professional Tivo encoder, decoder, player and editor. With it, you can convert Tivo to Windows Media Player friendly H.264 MP4, WMV effortlessly. Plus, it is surely in the support of playing Tivo videos directly for you. In addition, this H.265 Converter is also available to customize the output resolutions to any size the users want. Download the program and move on to see how to convert Tivo videos for Windows Media Player.


More Reading...

Smoothly Edit MOV files in Premiere Elements
Importing Olympus PEN E-P3 camera videos to iMovie
Workflow of Converting Sony A6300 4K videos to edit with Premiere Pro
Editing Blackmagic 4K footage in Premiere Pro CC/CS6/CS5
Convert DVD for Playback with Galaxy S7 Edge

Tutorial: Converting Tivo videos to Windows Media Player

Step 1. Add Tivo source

Install and run this best Tivo Video Converter. Click add button to import the Tivo files to the program.

Tip: When first loading, Brorsoft TiVo Converter will ask you to input your Media Access Key. Simply press “Option” button and switch to “TiVo” tab to enter your Media Access Key, and click “OK” to confirm.


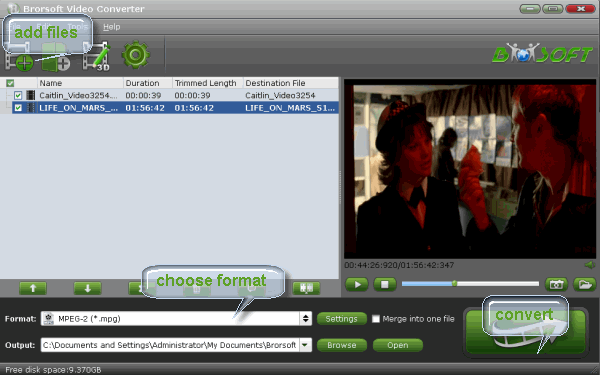
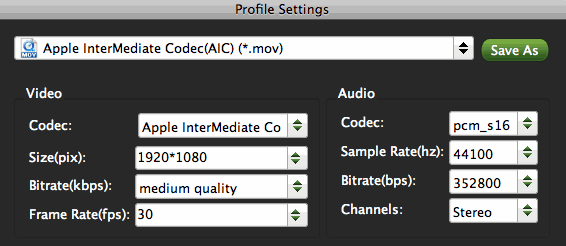
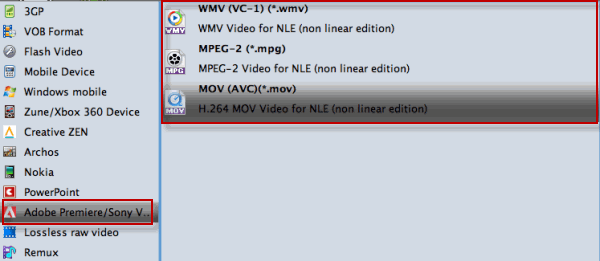
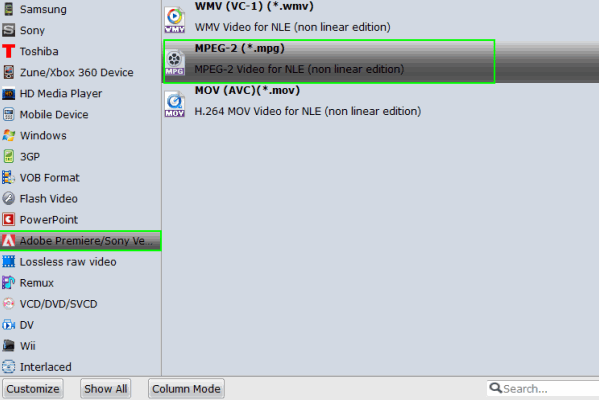
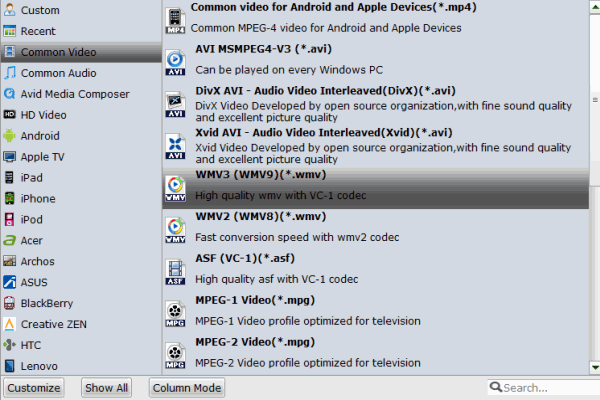
Step 2. Choose Windows Media Player friendly format

Click the Format menu, select Windows Media Player friendly format as your output video format. There, you can take WMV, MP4 as your output video format.


Step 3. Start conversion

Finally click the Convert button to begin encoding Tivo to Windows Media Player format.

After the short conversion, go to the output folder and drop the converted files into Windows Media Player. Once all this is done, your videos will be ready to play with Windows Media Player easily.

More Topics:

Convert TiVo to Avid
Transfer TiVo to Mac
Convert TiVo to iPad
Convert TiVo to Premiere Elements
Play Tivo Shows via Plex Media Server
Convert Tivo File for Viewing on an iPad
YouTube can't import ProRes files - Solved
Encode TiVo Shows to MP4 fast and easily
How to convert TiVo to MKV easily and quickly
Load Tivo files to Playback on Plex Media Server
How to Convert TiVo to MP4 without quality loss
Convert Apple ProRes 422/4444 Codec files to FLV
Fix Sony Movie Studio 12/13 Won't Open Tivo Files
Guide: Converting H.265/HEVC files on Windows 10
How to Convert Tivo files for Editing in Sony Vegas Pro
Convert H.265 to Synology NAS Supported Video Formats

Thursday, April 21, 2016

Smoothly Edit MOV files in Premiere Elements 10/11/12/13

Follow this simple guide, which offers you a quick fix for the problems with MOV video and Premiere Elements.

Source From: Import MOV files to Edit with Premiere Elements 11/12/13

"Premiere Elements 11 is giving me a "file format not supported" message when I try to import MOV into a project!"

"My friend has given me a lot of footage to edit for him, its HD and all MOV. After streaming these .mov files into my Premiere Elements 12, no any reactions received. What's the matter? Need any Plug-ins or anything? "

The basic reason behind such a series of issues, might ascribes to the MOV itself, since came from different sources, such as from some video editing software, or from different cameras, may have different codec inside. As we all know, Adobe claims that Premiere Elements offer native support for QuickTime .MOV format . So , how to solve this ? Make Premiere Elements editable MOV files smoothly? If you have check-out or read other related articles, forums or frequently asked questions' site; you might end up with the same conclusion that I have. The answer or solution is to convert your MOV video files to Premiere Elements editing-friendly format with the proper codec before playing your MOV files with Adobe Premiere Elements.


To finish the task, you're recommended to use Brorsoft Video Converter. With the best video converter you can effortlessly transcode all kinds of MOV as well as MP4, MKV, DivX, MTS, MXF, etc to Premiere Elements friendly format with high output video quality. Besides Premiere Elements, you can also effortlessly transcode MOV to MPG for Premiere Pro/Sony Vegas, DNxHD for Avid MC, WMV for Windows Movie Maker, etc. If you’re using a Mac, simply get the equivalent Brorsoft Video Converter for Mac to encode MOV to Premiere Elements on Mac OS X(El Capitan, Yosemite). Here is guide for converting MOV for using in Premiere Elements.


More Reading...

Convert DVD for Playback with Galaxy S7 Edge
Importing Olympus PEN E-P3 camera videos to iMovie
Editing Blackmagic 4K footage in Premiere Pro CC/CS6/CS5
Workflow of Converting Sony A6300 4K videos to edit with Premiere Pro

How to rewrap and transcode .mov for Adobe Premiere Elements

Step 1. Load MOV Files to the Program

Run the MOV file converter and you can import MOV clips to the program through "Add Video" button or just drag and drop the files to the program. If you like, check the "Merge into one" box to join MOV clips together.


Step 2. Select output format

Click "Format" pull down list to select Adobe Premiere/Sony Vegas > MPEG-2(*.mpg) as the best video format for Adobe Premiere Elements. WMV, MOV(AVC) formats are the good choice as well.


Tip: If the default settings do not fit you requirement, you can click "Settings" icon to and enter "Settings" panel to adjust video size, bit rate, frame rate, sample rate and audio channels.

Step 3. Start the conversion

Finally, hit the big Convert button to start converting MOV files to Premiere Elements supported file formats.

Once the conversion completes, you can click "Open" button to get the output files effortlessly. Now you have got it right, just import the converted MOV files to your Premiere Elements 11, 12, 13 for playback and editing freely.

More Topics:

Split or Merge Video files
Import AVI to Premiere Pro
Import MKV/AVI/WMV to FCP
Losslessly Convert Blu-rqay ISO to MP4
Can't Open iPhone media in Edius 6/7/8?
Insert DVD Collections to Sony Movie Studio
Restore iPhone contacts from iCloud selectively
Import Panasonic GH4 4K files to DaVinci Resolve
Import & Edit Sony Action Cam clips in Sony Vegas
Easy steps to import MTS videos to iPhone on Mac OS X
How to import & edit Blackmagic 4K clips in Davinci Resolve
Convert DNxHD MXF Files to MPEG-2 for After Effects CC/CS 6

Monday, April 18, 2016

Tips for Editing Olympus PEN E-P3 camera videos in iMovie

If you have problems during importing or editing Olympus PEN E-P3 camera videos using iMovie, you can follow this simple guidance to achieve your goal smoothly by converting E-P3 AVCHD clips to Apple Intermediate Codec.

The Olympus PEN E-P3 looks a lot like its forebears - not just the E-P1 and E-P2 but, just as significantly, the company's film era Pen F camera. The very welcome addition is a built-in autofocus illuminator light, in the form of a bright orange LED on the front of the camera (previous PENs were notorious for their reluctance to focus in low light). The autofocus system has been updated too, with 35 zones covering most of the image area. The movie recording specification has also been significantly upgraded, and the E-P3 can now capture full HD 1080i60 movies in AVCHD format.

After recording videos, some of you may want to import Olympus PEN E-P3 camera videos to iMovie 08/09/'11 for further editing before sharing. However, you may encounter problems like this:

"I recently got an Olympus PEN E-P3 camera. I recorded videos and want to edit them using iMovies. However, I can't seem to watch the videos or import them into iMovie. The videos are AVCDH, there is a clip folder (CPI) and a stream folder (MTS). I use to own a Canon that will automatically import the videos. But I tried to manually import the videos, but MacBook Pro can't detect the videos. I hope I can get some simple guidance."

The question asked on the forum maybe the typical question among E-P3 users. The main reason of the problems is the codec not well for editing in iMovie or Final Cut Express. If you can create the Camera Archive, that will copy everything to the Mac and make iMovie recognize the AVCHD clips from Olympus PEN E-P3. When your camera records it makes a series of folders that contain important info. If you try to pull just the clips into iMovie it's going to have problems. Fortunately, there is an easy way to fix this issue. To import the single .MTS files from Olympus E-P3 to iMovie, the easy workaround is to convert E-P3 MTS to Apple Intermediate Codec (AIC) encoded MOV files, which ensuring the best results when using iMovie 08/09 or iMovie '11.

To achieve your goal to edit Olympus E-P3 MTS clips with iMovie, below is a simple tutorial to make it smoother to get those .MTS files off of a memory card or hard drive to iMovie–and without the need to connect the camera to your Mac.

Transcoding Olympus E-P3 MTS files to Edit in iMovie

The quick workaround is to use the easy-to-use yet professional app called Brorosft MTS/M2TS Converter for Mac which can be used under OS X Leopard (10.5), Snow Leopard (10.6), Lion (10.7), Mountain Lion (10.8). It is free, clean and safe to install and use. With it you can effortlessly convert MTS to AIC MOV for iMovie 08/09/'11.

Step 1: Import AVCHD MTS videos to the software

Once launch the Mac MTS to iMovie Converter, you can click "Add Video" button (or "Add from folder") to load AVCHD MTS source files. Convert supports batch conversion, so you are allowed to add multiple files to convert at a time.


Step 2: Select "Apple Intermediate Codec (AIC) (*.mov)" as output format for iMovie

Click the format bar, and move mouse cursor to "iMovie and Final Cut Express -> Apple InterMediate Codec (AIC) (*.mov)". By the way, the Mac AVCHD Converter also supports output Apple ProRes format for using in Final Cut Pro.

Tips – Adjust audio and video settings

The Mac iMovie MTS Converter enables users to adjust audio and video settings before transcoding AVCHD files to iMovie AIC. Click "Settings" button, then you will enter the following interface, on which you are allowed to customize size, bit rate, frame rate, sample rate, and audio channel to your required ones.


3. Start the conversion process

Click the "Convert" button to start transcoding Olympus PEN E-P3 MTS to AIC MOV for iMovie.

When the conversion is finished, you can click "Open" button to get the generated QuickTime AIC .mov files effortlessly. Afterwards, you can launch iMovie, and then choose File > Import > Movies to import converted MTS files in iMovie for further editing.

Additional Tips:
If you want to edit Olympus E-P3 camera videos in Final Cut Pro, you just need to choose the "Final Cut Pro > Apple ProRes 422 (*.mov)" as output format in the second step; For Avid Media Composer, choose "Avid Media Composer > Avid DNxHD(*.mov)" as output; For Adobe Premiere Pro or Vegas Pro, choose Adobe Premiere/Sony Vegas> MPEG-2(*.mpg) as output.

More Topics:

Convert MTS to Andorid
Convert 3D AVCHD MTS
Trancode MTS for Premiere
Enable iPhone to Read/Play MTS files
Transcode MTS/M2TS to Pinnacle Studio
Top 5 Best DVD Ripping Program Review 2016
Edit Sony Alpha 7S ii xavc s 4k footage in FCP 7
Converting MTS files for Editing in Final Cut Pro
How to Convert and Import DVD movies into iMovie
Review of Top 5 Blu-ray to MP4 Converter Programs
Best Software to Convert MTS/M2TS to MP4 on Mac
Convert 2D to 3D MKV/MP4/AVI/MOV/WMV in SBS
Watch DVD VOB files on Surface Windows 8 RT Tablet
Best solution to solve MKV, VOB, TiVo, WMV video incompatibility
Workflow of Converting Sony A6300 4K videos to edit with Premiere Pro

Thursday, April 14, 2016

Best workflow of editing Sony a6300 XAVC S clips in Premiere Pro

Summary: Have some stunning XAVC S footage recorded from Sony a6300 camera? Want to enhance Sony a6300 XAVC S clips with Premiere Pro? Premiere Pro won'y import and accept Sony a6300 XAVC S files? No fret! All your problems will be fixed from the below guide.

The Sony a6300 is the Sony's latest mid-range mirrorless camera. Like the a6000 it still offers 24MP resolution but the autofocus ability, video capability, build quality, viewfinder resolution and price have all been advanced. The camera utilizes the XAVC S codec during video shooting, which records at a high bit rate of 100 Mbps7 during 4K recording and 50 Mbps during standard Full HD shooting, ensuring maximum detail and clarity in both video formats. On the other hand, there are many folks reporting that they have ran across importing issues when working Sony a6300 XAVC S footage with Premiere Pro. What's the matter? There is any possible to edit Sony a6300 XAVC S recordings in Premiere Pro without any hassles?


"i have tried importing XAVC S files from a Sony a6300 camera, into premiere, the imported files do not run smoothly when viewing them. IS it compatible with Premiere?"

Granted that the new version 8.2.0 of Adobe Premiere Pro CC can natively support XAVC S 4K and HD. Whereas, it's still quite tricky to handle XAVC S with Premiere Pro CC(before 8.2.0) or CS6, CS5, CS4. In addition, working 4K video files with Premiere Pro is extremely hardware intensive especially on older computer. Fortunately, you don't need to buy a new computer or update your Premiere Pro to the latest verison, alternatively a better and easier workaround is to convert your 4K/HD XAVC S clips to a more editable video format for Premiere Pro, such as MPEG-2.

Here the award-winning Brorsoft Video Converter for Mac cuts the buck at this point, letting you convert Sony a6300 4K/1080p XAVC-S to Premiere Pro compatible format with incredible fast speed and outstanding output quality. Besides, it also helps you convert XAVC S to other popular video formats like M4V, MOV, FLV, MP4, MKV, AVI, FLV etc for using on diverse multi-media devices including iPhone/iPad/iPod, Xbox, Apple TV, Google Drive, Chromecast, etc. If you are Windows user, you want to transcode XAVC to Premiere Pro as well as Windows Movie Maker, Davinci Resovle, Pinnacle Studio, After Effects and more NLE programs, you're highly recommended to adopt Brorsoft Video Converter for Windows.

How to Convert and Import Sony a6300 record 4K/1080p XAVC S Files to Adobe Premiere

Step 1. Add Sony a6300 recorded XAVC S files

Download, install and run the XAVC S to Premiere Pro Converter; click "Add" button on the top of the main interface to import source video to the program. It supports batch conversion and joining multiple video clips into one file.


Step 2. Select output format

Click "Format" pull down list to select Adobe Premiere/Sony Vegas> MPEG-2(*.mpg) as the best video format for Premiere Pro. WMV, MOV formats are the good choice as well.


Tip - Profile Settings:

In case the default settings do not fit your requirement, you can click "Settings" button and enter "Profile Settings" panel to adjust video size, bit rate, frame rate, sample rate and audio channels.

Step 3. Start converting XAVC S files

Hit the convert button, it will start converting XAVC S for Adobe Premiere Pro immediately. Soon after the conversion, just click "Open" button to get the generated files for natively editing in Premiere Pro CC/CS6/CS5/CS4 perfectly.

More Topics:

Playing MKV movies on JRiver Media Center
Import Sony A6000 1080P AVCHD file to iMovie
Edit Sony A6300 XAVC S files in FCP 7/X smoothly
How to deinterlace and convert AVCHD camera video
Convert and Import Sony FS5 4K XAVC to FCP 6/7/X
Making Sony A5000 MTS footage working with iMovie
Edit 4K XAVC-L files from Sony FS5 in Sony Vegas Pro
Converting Sony A6300 4K XAVC S for Editing in iMovie
Import MOV files to Edit with Premiere Elements 11/12/13
Import Sony PXW-FS5 XAVC/AVCHD footage to iMovie
Convert and Import Sony a6300 XAVC S to Avid Media Composer
Importing Sony A5000/A6000 MTS to DaVinci Resolve 9/10/11/12
How to transcode MXF files to MP4 on Windows and Mac/Windows
Edit Sony a6300 4k XAVC S/AVCHD/MP4 video in Davinci Resovle
Transcode Sony a6300 4k XAVC S/AVCHD/MP4 videos for Windows Movie Maker

Saturday, April 9, 2016

Tips for Editing Blackmagic 4K ProRes MOV files in Premiere Pro CC/CS6/CS5

ProRes in a MOV file format from Blackmagic Production Camera 4K is beyond the compatibility of Adobe Premiere Pro. You can’t get a flawless workflow in most cases. To solve the problem, you need to convert BlackMagic 4K ProRes files to Premiere Pro supported format and codec like MPEG-2. Below is how. 

If you need higher resolution, global shutter and a more creative depth of field then the Blackmagic Production Camera 4K models feature a large Super 35 size sensor and professional PL or EF lens mounts, absolutely is the perfect choice. With a built in 4K RAW and SSD recorder, it can record 4K videos in ProRes 422 (HQ) and compressed CinemaDNG files. However, if you try to import these amazing 4K footage into Premiere Pro CC, CS6, CS5, CS4 for further editing, you'll find it a painful experience as error messages keep cropping up from time to time. 


4K footage looks amazing but usually it can make video editing a real nightmare. Granted, Premiere Pro CS6, CC 7 can handle (usually) 4K files without much problem, but it is extremely hardware intensive. Thankfully you probably don't have to buy a new computer... but you do need to convert 4K video to Premiere Pro using MPEG-2 (1080p) as primary delivery format. The following paragraphs show us how to edit Blackmagic 4K footage with Premiere Pro without bogging down your computer. The process is surprisingly easy and can be done with the help of Brorsoft Video Converter for Mac 

With it, you can effortlessly encode/re-encode 4K H.264(MP4), XAVC, XAVC S, etc footage for smoothly importing and editing in various non-linear editing systems (NLE), including Adobe Premiere Pro, Avid Media Composer, Final Cut Pro, iMovie, FCE and more. If you work 4K files in Adobe Premiere Pro on Windows PC, please get BrorsoftVideo Converter to solve the issues. 

Download the 4K Video Converter for Mac 

 (Note: Click here for OS X 10.5)  

How to import Blackmagic 4K video into Adobe Premiere Pro 

1. Add raw files > Run the program you just set up. Drag and drop the 4K video files to the converter. You can also hit Add files button to import videos to the app. If you wanna combine several videos into one file, you can click the "Merge into one" box. 


2. Choose output format > Click "Format" bar and choose Adobe Premiere/Sony Vegas -> MPEG-2(*.mpg) as output format for editing raw 4K in Adobe with natively supported video codec. 


Tip: Advanced 4K video settings Set proper video/ audio parameters. Click the “Settings” button and set proper video/ audio parameters. You can reset set the video size, bitrate and fame rate. You can keep original 4K resolution or adjust video size to 2K or 1080 full HD as you need. 

3: Start converting Blackmagic 4K video 

Hit the convert button, it will start converting 4K ProRs 422 (HQ) from Blackmagic Production Camera 4K to Premiere Pro compatible format MPEG-2 immediately. 

Soon after the conversion, just click “Open” button to get the generated files. Now, it’s freely to import Blackmagic Production Camera 4K footage into Adobe Premiere Pro CC as well as Premiere Pro CS6/CS5/C/S4 for natively editing. 

More Topics: 

How to Import 4K video to Final Cut Pro 
The Best Alternative to AnyDVD software 
Get the Best 4K Ultra HD Video Converter 
How to Import 4K footage to Sony Vegas Pro 
Load YouTube video to Windows Movie Maker 
Edit MP4 files in Sony Movie Studio 13/12/11/10 
Tips for Factory Resetting iPhone without Passcode 
Insert Video From YouTube to PowerPoint 2013/2016 
Convert & Import Blackmagic 4K footage to Sony Vegas 
Watch DVD VOB files on Surface Windows 8 RT Tablet 
Convert Canon C100/C100 Mark II footage for editing on Mac 
How to batch convert AVI/MKV/VOB/MOV to Galaxy Tab S2 
Tips fixing Canon C300 MK II Corrupt MXF files on Mac OS X 
Import DJI Phantom 4/Phantom 3 4K to FCP/Premiere Pro/Avid MC 
Convert Sony FS100 60p AVCHD to Adobe Premiere Pro CC, CS6, CS5

Tuesday, April 5, 2016

Convert DVD for Playback with Galaxy S7 Edge

Summary: This tutorial mainly talks about how to rip DVD to Galaxy S7 Edge playable videos with best quality so that you can enjoy DVD movies with the S7 Edge on the move.

Samsung has officially launched the new Galaxy S7 and S7 Edge phone at Mobile World Congress in Barcelona. The Samsung Galaxy S7 Edge features a Quad HD Super AMOLED 5.5-inch display with a Full HD (2560 * 1440 resolution). If you have bought this excellent smartphone, what's your main purpose? For only calling, texting? Guess no, any Phone qualified. For surfing the Internet, playing games? Not necessary, Samsung S6 does its good job. Ever thought of copying your DVD collections onto Galaxy S7 Edge for free and ease playback, is it possible? Keep on reading and you'll get your dream achieved.


I think we do not need to discuss the reason deeply why Galaxy S7 Edge does not afford DVD movies directly since it is easy to find out: common smarthones or tabs like iPad, iPhone, Samsung Galaxy Tab, Galaxy S7 Edge don't have a built-in DVD-ROM or DVD player. According to Samsung official website, Galaxy S7 Edge supports MPEG4, H.263, H.264, DivX, XviD and WMV videos. To watch DVD movies on Samsung Galaxy S7 Edge, you need to convert DVD to MP4 or other Galaxy S7 Edge supported format first.

To convert DVD to Galaxy S7 Edge supported video format, you will need to use DVD ripper software, but it is not so easy to find an effective DVD ripper program, here we want to recommend the best Galaxy S7 Edge DVD ripper for you - Brorsoft DVD Ripper which can help you rip newly released DVDs to any video formats to Galaxy S7 Edge as you need, besides it can also rip and convert DVD to any HD videos for you. Besides, it rips and converts 2D/3D DVD movies to 250+ video/audio formats to play on popular devices like HTPC, iPhone, iPad, Apple TV, Galaxy, Zune, Creative Zen, Archos, iRiver, Blackberry, Xbox 360, Android tablet, Android phones etc. If you are a Mac user, you can turn to Brorsoft DVD Ripper for Mac (El Capitan included), which has the same function as the Windows version.

How to copy a DVD movie to Galaxy S7 Edge in a few clicks

1. Add DVD movies

Open Brorsoft DVD ripper, insert the DVD disc to your computer drive, and then click the "DVD disc" icon on the interface to navigate to the videos you want to convert. You can also add ISO file, IFO file or DVD folder. By clicking the dropdown list of "Subtitles", you can select your preferred subtitles while viewing your DVD movie.


2. Select output format

Click "Format" bar, you can easily find the optimized videos for Galaxy S7/S7 Edge under "Samsung > Samsung Galaxy S III Video (*.mp4)". The output videos could fit on your Galaxy S7 Edge perfectly.


Tip: You can also click "Settings" to change the video encoder, frame rate, resolution, etc. Remember the file size and video quality is based more on bitrate than resolution which means bitrate higher results in big file size, and lower visible quality loss.

3. Start ripping DVD to Galaxy S7 Edge

When everything is done, click the "Convert" button to start converting DVDs to Galaxy S7 Edge MP4 videos. After the conversion finishes, you can click Open to locate the converted MP4 files. Then you can connect your Samsung S7 Edge to computer and transfer the converted DVD movies for playback on the go.

More Topics:

Play DVD on Galaxy Tab 4
Play DVD on Galaxy Tab 3
Play DVD on Galaxy Note 4
Play DVD on Google Nexus 9
Enable CamStudio footage work with Premiere Pro
How to Copy DVD movies into Sony Movie Studio
How to Rip DVD movies to Premiere Pro with ease
How to Convert Nikon D90 H.264 AVI to MOV on Mac
How to Convert DVD ISO to H.264 MKV, MOV, MP4...
Convert and Import Nikon D90 H.264 AVI files to Pinnacle Studio
Convert Nikon D90 H.264 AVI to MPEG-2 for editing in Sony Vegas Pro